Names
In Excessive Plus you can use extended control characters to have colored names with special effects.
The main idea was taken from the popular mod 'OSP'.
The easiest way to create colored names is to use XP Qname 2.0 found here credits to  and all who helped make it, for a quick recap on how to set it up read comment 127 by
Of course, you can disable all effects by using xp_noBlink.
Characters

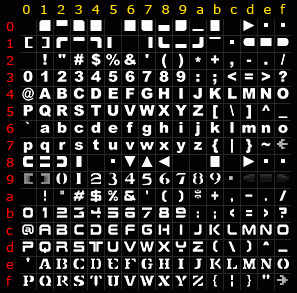
From the Character table, you can use different fonts and other characters to make unique names (tags).
For example, both of these codes will produce the word WASP in a different way:

#D7#C1#D3#D0
/seta xp_name "#D7#C1#D3#D0"

#F7#E1#F3#F0
/seta xp_name "#F7#E1#F3#F0"
Colors
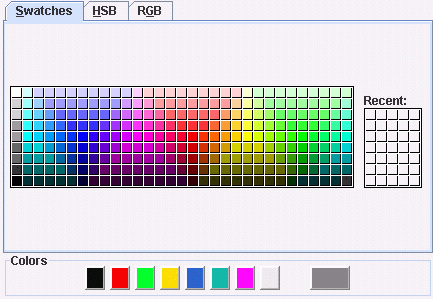
To have a colored name you can use the the basic Color line, or the more sophisticated Swatch, HSB, and RBG Tabs, or manually paste hex color codes from your favorite color picker/photo editor into the Code line.

Example, using the basic Color line (8 colors only) would produce the following code:
^0 - makes a text black.
^1 - makes a text red.
^2 - makes a text green.
^3 - makes a text yellow.
^4 - makes a text blue.
^5 - makes a text aqua.
^6 - makes a text fuchsia.
^7 - makes a text white.
So ^1WASP will become  and
and ^1W^2A^3S^4P will become  .
.
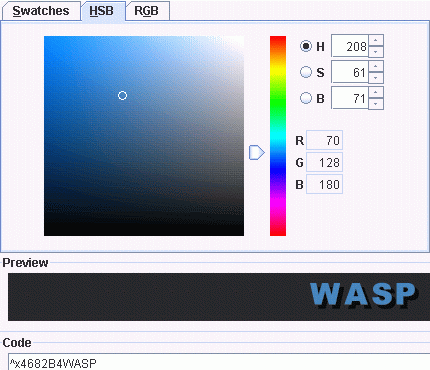
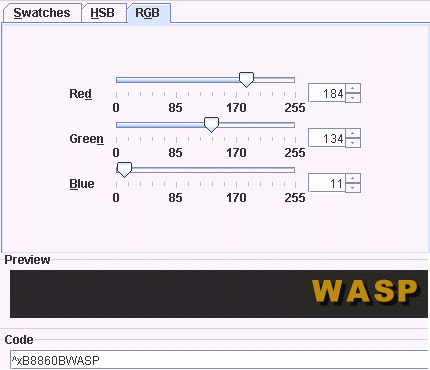
The HSB (Hue, Saturation, Brightness) and the RBG (Red, Green Blue) tabs allow you to have exact colors (examples, SteelBlue via the HSB tab and DarkGoldenRod via the RGB tab).


Effects
The Effects section includes several text altering attributes like blinking, fading, glowing and others.

Blinking
To make text blink select the effect button or use:
^b - makes a text blink at the first half.
^B - makes a text blink at the last half.
For example ^bte^Bst will become  .
.
Fading
To fade text select the effect button or use:
^f - will fade out a text and fade in again.
^F - will fade in a text and fade out again.
For example ^fte^Fst will become  .
.
Replacing
To replace text select the effect button or use:
^r - makes a text display at the first half.
^R - makes a text display at the last half.
For example ^rte^Rst will become  .
.
Foreground and Background Colors
You can improve the appearance of your name (tag) by using Foreground and Background Colors.
Simply place two (2) consecutive colors followed by text or symbols.
The text/symbol will use the 1st color (the foreground color) and the 2nd color (the background color) will be a shadow outline.
Hint: Look up the concept of Color Opposites to improve your efforts. If you use a program like Photoshop or the Gimp you can select the inverse of your color to have a background that will compliment your foreground color.
For example:

/seta xp_name "^7^1#C4#CD#DA^s^0^1#88^s^7^1#8D^s^0^4#F0#F2#E5#E4#E1#F4#EF#F2"
Glowing Text
You can add a glowing effect to your name (tag) for that Alien effect by using ^o or selecting the effect button.
For example, here is the name tag above with Glow on the player name:

/seta xp_name "^7^1#C4#CD#DA^s^0^1#88^s^7^1#8D^s^0^4^o#F0#F2#E5#E4#E1#F4#EF#F2"
Thin Text
If you are using lots of Capital letters, you may find it useful to use the Thin effect to reduce the width of your name (tag). To invoke the Thin effect use ^l or select the effect button.
For example, here is the name tag above with the Thin effect on everything:

/seta xp_name "^7^1^l#C4#CD#DA^s^0^1^o^l#88^s^7^1^l#8D^s^0^4^o^l#F0#F2#E5#E4#E1#F4#EF#F2"
Alpha Blending
To alter the transparency of text or symbols select the effect button or use:
^a1 - makes a text 10% visible.
^a2 - makes a text 20% visible.
^a3 - makes a text 30% visible.
^a4 - makes a text 40% visible.
^a5 - makes a text 50% visible.
^a6 - makes a text 60% visible.
^a7 - makes a text 70% visible.
^a8 - makes a text 80% visible.
^a9 - makes a text 90% visible.
For example ^a2t^a4e^a6s^a8t will become  .
.
Team Colors
While there is no button for this option, you can have your name change colors depending on your team:
^t - will be replaced by your current team color.
For example te^ts^7t will become on team blue  , team red
  ,
,
as spectator  and anything else
  .
.
Stop all Effects
To stop all effects from continuing past a certain point select the effect button or use:
^s - stops all effects.
Examples

/seta xp_name "^r^1^4*^R^4^1*^s ^f^0^7POLICE ^s^r^4^1*^R^1^4*"

/seta xp_name "^r^f^x77C818apple^xA5CC76juice^s^R^f^x2C7EE4blue^x76A9E7shift"

/seta xp_name "^0^r#1B#13#02#14^R#0A#08#1E#14^s^3test^0^r#12#02#13#1B^R#12#1E#08#0A"
xp_noBlink
To add via the console type: /set xp_noBlink 0
To add manually to your config: seta xp_noBlink "0"
Disables all fancy name effects, where:
0 = xp_noBlink is disabled
1 = xp_noBlink will disable all effects.
2 = xp_noBlink will disable all effects and draw everything in white color.
3 = xp_noBlink will disable all effects, draw all names in white color and make the console text also white.
E+ 1.03 Name Tag Conversion
If you played the previous version of Excessive Plus (version 1.03) you will notice that your name Tag does not display correctly anymore.
However, there is an easy way to make it compatable with Excessive Plus 2.0a. Simply copy the entire line from your old configuration to a new text file. Remember to save the file with a .cfg extension. Then, from XP Qname, CLICK "File" then "Open" and locate your config file.
For example, here is an old name tag about to be converted to E+ 2.0a style.

Here is the converted tag in Xp Qname.

Either copy and paste the converted code or save the new code and optionally a Country Flag into a new config file. To do so, simply CLICK "File" then "Save or Save As" depending on whether you want to overwrite the original config or create a new config file.
Here is the resulting config file with the new tag and country flag.

Note that E+ 2.0a uses a new client variable (cvar) "xp_name" instead of the old Q3 cvar "name". Consequently, if you later decide to edit the file, remember to modify the line with "seta xp_name" not "seta name".
Also, if you open an old name tag and the result is garbage then use a different text editor. My preferred editor "NotePad++" often had problems but Xint and EditPad Lite worked fine.
GIF and Preview Options
You can toggle the Preview between "16x16" and "32x32" sizes. To do this, CLICK "Options" and select the size that you wish to display.
Note, this only affects Preview and Saved Gif files. It will not change how your name tag displays in Quake III or OpenArena.
The name tags below are the same. The one of the left was displayed in 16x16 preview and the one on the right was displayed in 32x32 preview.


Besides toggling the Preview size, you can change the Preview and Saved GIF quality by CLICKING "Options" then "Gif Quality" and selecting the quality. Please note that you can also change the background of the Saved GIF either before or after you have entered the code. The background will not show up in the Preview but it will in the Saved GIF.
To save your name tag as a GIF, CLICK "File" then "Save As GIF".
The name tag on the left was saved as a 16x16 GIF and the one on the right was saved as a 32x32 GIF.


The 1st image below shows the button in XP Qname which will indicate the background color of your Saved GIF. Note, the Preview background did not change. The 2nd image shows the Saved GIF.


==============================================================================
Document Name: XP Qname HTML User Guide v1.1
Author: WaspKiller
Date: January 2010
Notes: This document used the format and some text
and images from the E+ 1.03 Qname User Guide.
==============================================================================